Yesterday’s high was between +5C and +7C. The wind was pretty minimal. Patagonia Capilene 2 long bottoms under Marmot Hatteras nylon canvas pants were fine. On top I had a Capilene 1 silkweight tee, a Capilene 3 quarter-zip long-sleeve, and R1 hoody. That ranged from about right to too warm. The zippers on both the long-sleeve and hoodie helped regulate the temperature. It would be nice if there was a R1-weight piece with the lighter-weight micro-grid fabric on the entire back for use with a pack. In the evening on the walk to dinner, I deleted the Capilene 3 long-sleeve since I’d be indoors for a long period and didn’t want to overheat. It was a bit cold, as the temperatures dropped toward the evening low of +2C after the sun went down, and the wind came up to 5-10 m/s. It was fine for the short walk, but anything more would have been uncomfortable. As a side note, the Capilene 3 long-sleeve doesn’t play well with the R1 fleece – their surfaces bind against each other, making it hard to put the R1 on without the baselayer sleeves getting all bunched up, or the fleece’s back getting hung up across the shoulders. Continue reading ‘Layering Test 5’
Archive for the 'Gear' Category
Page 3 of 11
The warm weather has made all the unremoved snow in the streets melt and the vehicular traffic has churned it into a brown slurry. The snowpack on the sidewalks are corny slush in the sun or slick ice-slides in the shade. I’ll never understand the half-measures in this city. It’s not like it has never snowed before. It’s not like they don’t have front-end loaders and dump trucks. They’ll clear the center turn lane and the inner traffic lanes of a four-lane highway, but leave mountainous piles of snow in the outer lanes. I can understand just getting some lanes open immediately after a blizzard, but that’s where the work stops. They don’t clear the remaining mess in subsequent days and it just keeps piling up. When the temperatures drop next week, all that slush in the streets will harden up into an ankle-twisting egg-crate of ice. Continue reading ‘Wet and Messy’

 In my review of the Bell Super all mountain helmet I mentioned how the GoPro accessory mount is a bit weak. The black parts in this pic are the stock Bell part. The little Velcro tab is all that keeps it attached. The underside of the black plastic is molded in the shape of the vent hole that it fits in so that keeps it from wiggling too much, but you can only get so much tension from the Velcro. When I put the anko extension on the GoPro it got seriously wiggly. My solution was to make a plate that goes on the inside of the helmet and use bolts to retain the mount. I used the PVC plastic sheet that I have a pile left over, cut it to shape, and heated it with the heat gun and formed it into the helmet. I then drilled holes to take a nylon screw and nut, I really didn’t savor the idea of metal screws pointed straight at my forehead. I had to grind a little on the center tab to fit the nut in there, but it seems to work well. Now I just have to work out some kind of a bumper to hold up the extension arm, other wise the camera ends up drooping into my face.
 My Fox Flux was getting a bit long in the tooth. It still looked in good shape although the visor was long gone somewhere on the Tantalus road, but it’s been a few years so it was time to look at a replacement. Arriving on the scene is the new Bell Super “all-mountain” helmet. AM, what is it? Extreme XC, pansy DH? Anyway, what distinguishes this helmet and most “AM” helmets is the supposed increased covereage for more of the head, mainly the back, without being a full head helmet. The Super also features a pretty prominent visor which can be replaced with goggle hooks and additional venting at the brow area to further aid the use of goggles with this helmet. And in keeping with current trends, it also features an accessory GoPro mount that can be popped into the front vent. Has a rear retenion dial system. Uses microshell construction to keep weight down, anti-microbial pads to keep the funk down.
So with our recent mountain bike revival where we’ve actually been riding those contraptions again, I’ve been transporting my bike by taking off both wheels and cramming it into the back of the FR-S. To it’s credit it fits without too much finagling. It’s still annoying, scuffs the interior, and woe be the day when I get poopy tire. So I started working on the external bike rack, there’s already been people who’ve done it. The one that I was going to try for is to use the large threaded holes in the bumper that normally is for the two loop. The FR-S fortunately has two, which you then make something to thread two rods into. Then any typical roof rack mount should work. People have gone as far as having machine shops machine something out of stainless rod. The other method was to go get a pair of the OEM tow loops, cut off the loop, then weld on a tube/pipe. I investigated that. Toyota parts wants over $35 per, and they were not in stock. So I ran around to various shops in Mapunapuna. Industrial Hardware had the big arse metric bolts that match, 16mmx1.5. I bought a pair of the longest ones they had for $11 the pair. Then went across the street to Moos Machine Works to look for tube. They had nothing that would fit the bolts. Back across to Hardware Hawaii where some 3/4″ conduit happen to fit. I wasn’t going to trust this to be strong enough, but bought some for mock up work.
 So first thing to do was to chop off the heads. Few minutes with the grinder and cutoff wheel took care of that.
  Threading it into the bumper immediately reveals that it’s too short. The actual threads are recessed far behind the bumper/ There is a metal face right behind the plastic, but the actual frame as way back there. So if I tried to attach a tube to the bolt it would have to be small enough to fit inside this outer hole, which would be not much more than the 3/4″. Hmm. I proceeded to fit up the 3/4 conduit the test fit everything.
“The Company” has served Orca and Mojo with the C & D finally, so get your various Kitty-iterations while you can. I’m somewhat surprised it took this long, but I guess their clientele generally doesn’t move in tactical circles, so it may have gone unnoticed a lot longer (at least longer than the copyright-infringement diecut stickers).
(0) So
So  here are the parts roughly assembled onto the old charcoal canister bracket. Only needed to drill two small holes for the stainless sheet metal screws that came with the white plastic clip thing and drilled two holes in it to thread the ziptie through. Have yet to road test, the battery in the road FX kind of went flat so charging right now.
Oh, and as for routing it back into the intake where the canister went, the BVSV in the coolant line is broken so I’m not sure what would happen if I routed it back into the intake with it open all the time. I suppose if I put it before the AFM then it would be no problem.
 The rally FX being all race has slowly been loosing extraneous things. One of the more recent things I did was remove the charcoal canister. It’s not needed for the car to run, however removing it and capping the line from the gas tank that used to go to it causes some issues. What happens is that modern fuel systems are sealed. The gas tank cap holds pressure as a limited one way valve. As you use up fuel, that would create a vacuum in your tank and make it hard for the pump to work, so the gas cap has a one way valve to let air in. But as things warm up, vapors in the tank expand and cause the tank to become pressurized. Normally these excess vapors are routed into the charcoal canister to be absorbed until they can be put back into the intake and burned off. Without the canister pressure builds until the safety release in the cap opens, which is enough pressure to also cause liquid gasoline to come puking back out the cap.
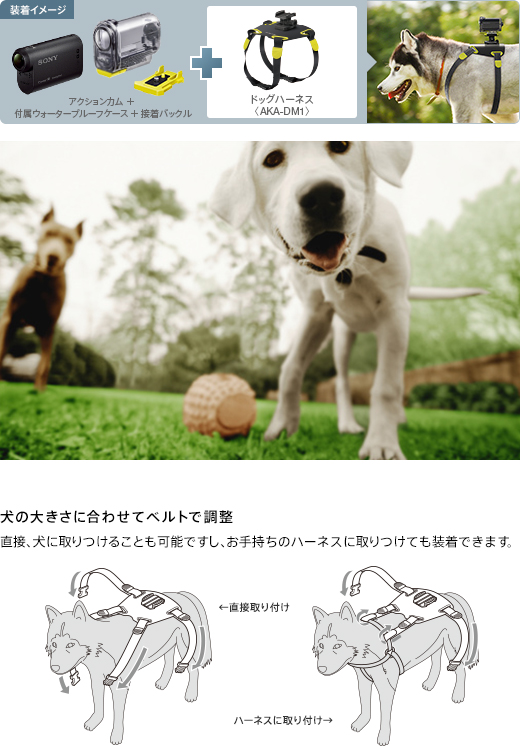
The Sony AKA-DM1 is probably one of the more unusual official action video camera mounts I’ve seen. I’m sure mounts like this have been jury rigged already, but for a big company to actually have one out for the specific application is interesting.
 OK, I guess I’ve been abusing my GoPro beyond it’s capabilities. This was mounted under the front bumper, and today’s course had a couple sections that became rutted so was contacting dirt. Prob should have taken a cue when one of the click in mounts snapped, but instead I switched to shorter mount and kept going. On one of my final runs I got back to see that the mount was intact, but the case was empty! It looks like the latch popped open. Eventually we were able to find the camera and the wifi back. It’s pretty banged up but it appears to still turn on. Connector is crammed full of dirt and the lens is scratched. The real suck thing is that I didn’t notice until I got home, the flash card is gone! No footage!